|
Sport" Bellett sedan PICTURES
| Author |
Message |
|
Glenn
Joined: Tue May 10, 2011 2:23 am
Posts: 2817
Location: Melb.
Car(s): '72 Sport Bellett (imported 180912), M/B AMG A35, i30, had Belletts in past, 2 sed, 3 GT's.
|
Hi Jeff
front indicators would be a huge issue. I have some clear LED lights i could add i guess if i have too though
I am hoping that its mainly seat belts and possibly the rear blinkers to be orange. I can fit spare lights with the clear centres and orange bulbs to overcome that ........ fingers crossed though !
I filled in his form and returned it. Details of the car basically. I also have to have import papers, customs clearance papers etc
I said the car is a 4 seater. What did you do ? ie 3 or 2 belts in the back ? Lap sash in back will be a bit of work if thats needed.
_________________
'72 PR60 Sport
|
| Mon Nov 12, 2012 11:36 pm |
 
|
|
|
gt orphanage
Joined: Fri Mar 20, 2009 8:23 am
Posts: 1816
|
Glenn if the front indicators are a issue i have a set of clear ones on my marroon gt you can borrow for rego purposes 
|
| Tue Nov 13, 2012 12:21 am |
|
|
|
Glenn
Joined: Tue May 10, 2011 2:23 am
Posts: 2817
Location: Melb.
Car(s): '72 Sport Bellett (imported 180912), M/B AMG A35, i30, had Belletts in past, 2 sed, 3 GT's.
|
gt orphanage wrote: Glenn if the front indicators are a issue i have a set of clear ones on my marroon gt you can borrow for rego purposes at the moment i don't know but his web page shows the following items.... Many thanks for the kind offer. I will take it up if it looks like i have to. A 1972 car is required to comply with the following ADRs: ADR 1 Reversing Signal Lamps ADR 2 Door Latches & Hinges ADR 3 Seat Anchorages for Motor Vehicles ADR 4 Seat Belts ADR 5A Seat Belt Anchorages ADR 7 Hydraulic Brake Hoses ADR 8 Safety Glass ADR 10A Steering Columns ADR 11 Internal Sun Visors ADR 14 Rear Vision Mirrors ADR 15 Demisting of Windscreens ADR 20 Safety Rims ADR 22 Head restraints ADR 25 Anti-theft Locks ADR 26 Vehicle Engine Emission http://www.infrastructure.gov.au/roads/ ... nline.aspx
_________________
'72 PR60 Sport
Last edited by Glenn on Tue Nov 13, 2012 2:53 am, edited 1 time in total.
|
| Tue Nov 13, 2012 12:36 am |
|
|
|
PR95
Joined: Tue Mar 24, 2009 11:52 am
Posts: 843
Location: Sunshine Coast QLD
Car(s): PR95 PR20 WASP SWB NH Pajero Superchrged NT Pajero BF SR6 Falcon
|
Mine also registerd as 4 seater, no centre seat belt in rear. You will find that all the lower mounting points are there for the rear belt, and all there for front belts, Inertia reel front and l/s rear.
Geoff
|
| Tue Nov 13, 2012 12:40 am |
|
|
|
Glenn
Joined: Tue May 10, 2011 2:23 am
Posts: 2817
Location: Melb.
Car(s): '72 Sport Bellett (imported 180912), M/B AMG A35, i30, had Belletts in past, 2 sed, 3 GT's.
|
yes, i found the upper front holes in the pillar ok. Not yet pulled rear seats out to check for those mounts. Better do it asap. As discussed before, p[utting l/s in rear of sedan might be tricky, depending on how high they want the upper mount.
_________________
'72 PR60 Sport
|
| Tue Nov 13, 2012 12:42 am |
|
|
|
Glenn
Joined: Tue May 10, 2011 2:23 am
Posts: 2817
Location: Melb.
Car(s): '72 Sport Bellett (imported 180912), M/B AMG A35, i30, had Belletts in past, 2 sed, 3 GT's.
|
moving along, all the brake parts arrived and look good.
All but the bootlid top now painted.
Attachments:
 RH-sill-painted.jpg [ 175.36 KiB | Viewed 19011 times ]
 master-cyl-recod.jpg [ 50.76 KiB | Viewed 19011 times ]
_________________
'72 PR60 Sport
|
| Wed Nov 14, 2012 11:01 pm |
|
|
|
Stickman
Joined: Fri Apr 10, 2009 11:29 pm
Posts: 1524
Location: Kallangur, Brisbane QLD
Car(s): 3x1965 PR20(Donkey, Jenny n Bundy) 1 1969 PR20(Percy) 2 1968 PR20(Eugine n GT Donor) 1 1968 PR91 GT, 1 1965 Wasp
|
Looks like your making steady progress there Glenn
I take my hat off to you, good work.
_________________
1xB+1xE+2xL+1xE+2xT=BELLETT
RUST isn't a crime
www.gartdesign.com.au
|
| Wed Nov 14, 2012 11:03 pm |

|
|
|
gricey
Joined: Wed Feb 24, 2010 9:37 pm
Posts: 692
Car(s): 2 GT Belletts bellett sedan . Florian.gt project.fj Holden. Gemini.lc gtr.datsun240 z
|
Glen . What's master cylinder off . Gricey
|
| Thu Nov 15, 2012 5:56 am |
|
|
|
Glenn
Joined: Tue May 10, 2011 2:23 am
Posts: 2817
Location: Melb.
Car(s): '72 Sport Bellett (imported 180912), M/B AMG A35, i30, had Belletts in past, 2 sed, 3 GT's.
|
master is the late Bellett type. Not sure when they came in, maybe 1969 or 70. Thats why the later models have the cutaway in the towers, to take the longer dual master
I simply got it sleeved and fitted all the new parts in it, that came with the car. Even the rubbers between the resevoir and master were there. P/N 9-09720559-0
I took a front wheel off today also, the Pads are like new. Rotors down to 8.2mm so plenty left.
_________________
'72 PR60 Sport
|
| Thu Nov 15, 2012 6:04 am |
|
|
|
Glenn
Joined: Tue May 10, 2011 2:23 am
Posts: 2817
Location: Melb.
Car(s): '72 Sport Bellett (imported 180912), M/B AMG A35, i30, had Belletts in past, 2 sed, 3 GT's.
|
Battery box area is now fixed also. Turned out that it was a bit more extensive than first thought and had to remove metal and replace right up to top of wheel arch area. Must have been a very leaky/fumy battery that was in the car at some stage. Now has a sealed type. Will stoneguard the wheel arches next then only the brakes to re-fit.
The engineer seems not to be interested in doing the car.. no replies from him after i sent the details of the car.
Not much chnace now to make the all Japanese car show this coming weekend. Disappointing for me .
_________________
'72 PR60 Sport
|
| Sun Nov 18, 2012 11:35 pm |
|
|
|
1968GT
Joined: Tue Dec 23, 2008 2:32 am
Posts: 1266
Location: MUDGEE. NSW
Car(s): 1968 PR91 Bellett GT. 2014 ISUZU MU-X, 2016 Jayco 22' Starcraft Caravan, 2013 KIA Reo shopping trolley!!
|
Glenn, no doubt disappointing for VIC members going also, I am certain they would have liked to have seen your car there also.
Not to worry, you gave it your best shot!
We are all looking forward to seing your car on the road.
Dave.
_________________
BELLETT GT, BELLETT SEDAN, MU-X, D MAX, or ANY ISUZU, or A FORD XR6 TURBO, Premium motoring!!!!
|
| Mon Nov 19, 2012 12:08 am |
|
|
|
Farmer
Joined: Tue Oct 28, 2008 12:17 pm
Posts: 2611
Location: Rye Park, N.S.W.
Car(s): Doris, AuntyMary, Shrek, Jimmy; GT, Wasp, Flo & Sed unrestos; 65 Elf; 82 Rodeo, 60 TX550, 72 Sport, & a Sigma.
|
A fantastically thorough job Glenn, it's great to see the progress. Hopefully the paperwork side will fall into place soon. Always seems to be the slow part, getting people to tick boxes.  Cheers, Matt.
_________________
Life is far too short not to fill it with what you love. - Jackie French.[/size]
|
| Fri Nov 23, 2012 3:16 am |
|
|
|
Glenn
Joined: Tue May 10, 2011 2:23 am
Posts: 2817
Location: Melb.
Car(s): '72 Sport Bellett (imported 180912), M/B AMG A35, i30, had Belletts in past, 2 sed, 3 GT's.
|
 Thanks Matt, I'm really only doing what has to be done imediately although once you start to remove things, something else pops up that has to be done or at least easier while it's apart. The end result will be a hopefully tidy Sport but not 'restored' in the true sense. Not a show winner that's for sure ! The battery area alone consumed almost 4 days. The rail area around the bolt holding the suspension was er... not there ! I cut the whiole side out of the area and fitted 1/16" plate inside and around that area. Very difficult to do with the engine in the car, not to mention care needed when welding ! As it turned out, i then had to replace more metal right up to the top of the inner guard which was mighty 'thin'.  I now have the rear and master cylinders fitted and rears are bled. Front to do yet. Centre exhaust pipe fitted, started the engine, but it's leaking at the rear so need to look at that a bit closer. I fitted a 2 bolt flange at the front to make it easier to fit and remove. No leaks there. Made up brackets to fit interia reel belts to front. Found the lower holes for the rear belts but unsure where to fit the top mount. There is precious little metal in the parcel shelf area of a sedan to fit a mounting point. I have to have a min. 50 x 75mm 3mm plate behind the fitting. There is no space like that i can find yet. I need to remove the stereo speakers (and radio) from the car also then pull out the parcel shelf insert for a closer look. Ideally I would like a std. parcel shelf to replace this one with no big holes in it! I have everything painted but run out of paint for the bootlid so it only has a couple of coats on it. Debating what to do here as the paint match from paint vendor is not brillaint. Cleaned up the original grille and repainted it matt black. Found some nifty spray can in a BIG hardware store that supposedly kills minor rust also when applied. Anyway, it came up pretty well. Not so great was the SPORT badge on the front which the owner had sprayed matt black. Trying to clean it back to chrome finish. But the new grille end pieces that came with the car should look pretty good with the newly painted centre. Found another engineer who never heard of a Bellett but is happy to do the car and at my place too. It's a shame i couldn't have it running for this weekends Japan Show but that's life I guess. Maybe, the BCCV Xmas lunch, if there is one. Glenn
Attachments:
 exhaust-pipe-replacement.jpg [ 31.81 KiB | Viewed 18905 times ]
 battery box area_rail too.jpg [ 28.86 KiB | Viewed 18905 times ]
_________________
'72 PR60 Sport
|
| Fri Nov 23, 2012 5:16 am |
|
|
|
Glenn
Joined: Tue May 10, 2011 2:23 am
Posts: 2817
Location: Melb.
Car(s): '72 Sport Bellett (imported 180912), M/B AMG A35, i30, had Belletts in past, 2 sed, 3 GT's.
|
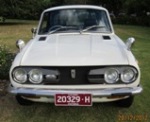
here's is the grille with re-painted centre section. I actually prefer the late 68 style grille but I guess I should keep it original !
The 'SPORT' badge fits in the left side opening. The other side is blank i think as std. ie has a blanking plate in the opening.
Attachments:
 grillePR60_1972.jpg [ 186.51 KiB | Viewed 18904 times ]
_________________
'72 PR60 Sport
|
| Fri Nov 23, 2012 5:30 am |
|
|
|
Glenn
Joined: Tue May 10, 2011 2:23 am
Posts: 2817
Location: Melb.
Car(s): '72 Sport Bellett (imported 180912), M/B AMG A35, i30, had Belletts in past, 2 sed, 3 GT's.
|
time just flies and still not done...... but some progress. Guards back on, grilled fitted etc. Biggest hassle is the rear seat belt mounts. Upper. After discussion with eng. my idea to fit a strap back into the wheel wheel was OK'd. (subject to actually seeeing it!) It's more or less an upside down 'U' shape piece of 50mm strap, bolted to the wheel well and back of the seat area. Backed with plates. So, 2 days of friggin about and it's done. Mounts anyway. Like before, one thing leads to another. I wasn't too happy with the all the red paint overspray in there so decided to rub down and paint the inner wheel arches also. Takes time. I had front belts from Hotrod project and can't find the stalk for one of them
Attachments:
 rear-belt-mtg-parcel-shelf-view.jpg [ 153.42 KiB | Viewed 18841 times ]
 rear-belt-mtg_inside-boot.jpg [ 132.35 KiB | Viewed 18841 times ]
_________________
'72 PR60 Sport
|
| Fri Nov 30, 2012 3:04 am |
|
|
|
Glenn
Joined: Tue May 10, 2011 2:23 am
Posts: 2817
Location: Melb.
Car(s): '72 Sport Bellett (imported 180912), M/B AMG A35, i30, had Belletts in past, 2 sed, 3 GT's.
|
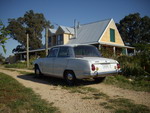
still plugging away. All the belts are in, after fitting the grille and lights, now find that left high beam insert is dead. ^%(*(*%$&* has to come out again. I was hoping to tee up the Eng. for wednesday. maybe.... anyway, started her up and drove her out of the shed for the first time under her own power for a few pictures but mainly to sweep out the shed, which is getting pretty grotty with sanding dust, rusty crap out of the sills etc. One problem though is the RH door restrainer. It does not work. Must be something wrong inside the door. ANYBODY got any ideas on this ?glenn
Attachments:
 Sport-front-left-view.jpg [ 231.55 KiB | Viewed 18789 times ]
_________________
'72 PR60 Sport
|
| Sun Dec 02, 2012 7:39 am |
|
|
|
CQGT
Joined: Sun Dec 12, 2010 10:04 am
Posts: 385
Location: Boyne Island.Gladstone. Queenland
Car(s): '70 PR91,'69 PR20 x 2,'66 PR20,'65? KR20's x 2,'66 ? PR90,2012 d22 STR Navarra.
|
Hi Glenn,
Most of the door checks have a approx. 50mm pin which has a nylon sleeve over it just inside the
front of the doors. The nylon sleeve acts as a buffer so that check doesn't rub against the steel pin
and scratches the paint etc.. Over time this nylon sleeve wears away and the check is against the pin.
The pin also has to roll with the door check. It's held into the door by a "e" type circlip or on some occasions
a clevis pin clip. This looks like an enlarged hairpin. It'sthe easiest to remove and replace. The "e" clip
isn't. You may have to use a stanley knife to remove the old nylon sleeve. Push the pin up.and remove.
If you have some clear PVC tubing, as in fuel hose, will do the trick as a replacement of the nylon. Measure
the length of the area inside of door and cut the tubing a bit undersize. As you dismantle you will
get the idea on how to reassemble. Being a contortionist or double jointed does help. Don't forget to tie
the door so it doesen't open too far and crease the panel and fold the back of the fender.
Hope it all goes well. The car is looking good.
Dave.
_________________
CQGT.
I'm the Dave with the convertible.
|
| Sun Dec 02, 2012 11:14 am |
|
|
|
1968GT
Joined: Tue Dec 23, 2008 2:32 am
Posts: 1266
Location: MUDGEE. NSW
Car(s): 1968 PR91 Bellett GT. 2014 ISUZU MU-X, 2016 Jayco 22' Starcraft Caravan, 2013 KIA Reo shopping trolley!!
|
Looking for more pictures Glenn, you're work is amazing, car looks great!!  How about some pictures of your engineering with the seats belts mounted? You certainly did well with those mounts. Gee Glenn maybe one day we can have a Glenn Percy re union with majority of the cars you have worked on??  
_________________
BELLETT GT, BELLETT SEDAN, MU-X, D MAX, or ANY ISUZU, or A FORD XR6 TURBO, Premium motoring!!!!
|
| Sun Dec 02, 2012 8:21 pm |
|
|
|
Glenn
Joined: Tue May 10, 2011 2:23 am
Posts: 2817
Location: Melb.
Car(s): '72 Sport Bellett (imported 180912), M/B AMG A35, i30, had Belletts in past, 2 sed, 3 GT's.
|
1968GT wrote: Looking for more pictures Glenn, you're work is amazing, car looks great!! How about some pictures of your engineering with the seats belts mounted? You certainly did well with those mounts. Gee Glenn maybe one day we can have a Glenn Percy re union with majority of the cars you have worked on?? Hi Dave I will take a pic of the fitting later.....but i drilled clearance holes in the plastic parcel shelf insert then the belt ends bolts though them into the plate. I need to find a better insert though as this one has huge holes cut in it for aftermarket speakers.
_________________
'72 PR60 Sport
|
| Sun Dec 02, 2012 9:15 pm |
|
|
|
Glenn
Joined: Tue May 10, 2011 2:23 am
Posts: 2817
Location: Melb.
Car(s): '72 Sport Bellett (imported 180912), M/B AMG A35, i30, had Belletts in past, 2 sed, 3 GT's.
|
CQGT wrote: Hi Glenn,
Most of the door checks have a approx. 50mm pin which has a nylon sleeve over it just inside the
front of the doors. The nylon sleeve acts as a buffer so that check doesn't rub against the steel pin
and scratches the paint etc.. Over time this nylon sleeve wears away and the check is against the pin.
The pin also has to roll with the door check. It's held into the door by a "e" type circlip or on some occasions
a clevis pin clip. This looks like an enlarged hairpin. It'sthe easiest to remove and replace. The "e" clip
isn't. You may have to use a stanley knife to remove the old nylon sleeve. Push the pin up.and remove.
If you have some clear PVC tubing, as in fuel hose, will do the trick as a replacement of the nylon. Measure
the length of the area inside of door and cut the tubing a bit undersize. As you dismantle you will
get the idea on how to reassemble. Being a contortionist or double jointed does help. Don't forget to tie
the door so it doesen't open too far and crease the panel and fold the back of the fender.
Hope it all goes well. The car is looking good.
Dave. Thanks Dave, i will take a closer look asap. Probably it will now have to wait until after RWC. Just running out of time. I thought there was some sort of sleeve over the pin but i never knew the pin could be removed. The previous owner had fiited some sort of packing behind the check strap and I wondered why but never took much more notice than that when removing the door.. I guess he put the strap on a bit more of an angle to frig it. Trouble is now that if one opens the door too much, the whole lot gets jammed inside the door. I have some nylon rod so could make another sleev but it sounds like getting the pin out will be a challenge!!
_________________
'72 PR60 Sport
|
| Sun Dec 02, 2012 9:20 pm |
|
|
Who is online |
Users browsing this forum: No registered users and 38 guests |
|
You cannot post new topics in this forum
You cannot reply to topics in this forum
You cannot edit your posts in this forum
You cannot delete your posts in this forum
You cannot post attachments in this forum
|

|
|